Nailed It: Covering Roof Damage the Right Way
Keep Calm and Cover On
Did a storm just rip through and leave your roof looking like Swiss cheese? Wondering how to keep water out without waiting for a full repair?
This post walks you through exactly how to tarp a roof step by step, from choosing the right tarp to anchoring it safely and checking it after it's up.
By the end, you'll know how to protect your home from further damage while saving time, stress, and possibly a lot of money on your roof replacement.
How to Tarp a Roof Step by Step
If you're looking for a quick, effective way to stop a leak or block out incoming rain, tarping is your best temporary fix. The key is to act fast and tarp a roof before more water damage or further damage hits your attic or drywall.
Here's how to tarp a roof in just a few simple steps:
- Wait for dry weather and grab a buddy to help.
- Use a tape measure to size up the damaged area.
- Choose a tarp large enough to extend 3 to 4 feet past the leak.
- Clear away any debris on the roof surface.
- Use roofing nails, cap nails, or screws to attach wooden boards and secure the tarp.
- Start at the ridge and work downward to ensure rain sheds off.
- Reinforce all edges so wind can't get underneath.
You don't need to tarp the entire roof. Just make sure the damaged area is fully covered and everything is sealed tightly.
Contact us today about your roof replacement needs.
Staying Safe While You're Up There
Before you grab a tarp and climb a ladder, stop and think about safety. Tarping a roof is physical work that involves height, slippery surfaces, and sharp tools. Rushing it or doing it in unsafe conditions can quickly lead to serious injury.
Check That It's Safe to Walk
Only step onto your roof if you're sure it's solid.
If the roof feels soft or spongy underfoot, or if shingles are shifting around as you move, it might be too damaged to walk on safely.
Some roofs also have underlying water damage or rot that isn't visible from the outside, so check from inside the attic if needed.
If anything feels off, call a roofer instead of risking a fall.
Avoid Bad Weather
Trying to tarp a roof during a storm is never a good idea.
Wet shingles, strong winds, and limited visibility make everything more dangerous.
Even if the damage just happened, wait until the rain stops and the roof surface dries out before starting your repairs. This gives you a better chance of placing the tarp correctly and securing it without slipping.
Gear Up and Work With a Partner
Never tarp a roof alone.
Always have someone nearby to hold the ladder, pass tools, and keep an eye on you.
Wear slip-resistant shoes, gloves, and eye protection.
If possible, use a harness or tie-off system to stay secure, especially on steep slopes.
Safety should always come before speed.
What is and isn't normally covered by roof insurance?
Prep the Roof for the Tarp
Your tarp won't work unless the roof is properly prepped first. That means removing anything that could get in the way and measuring the space carefully so you know exactly how much cover you need.
Clear Out Debris
Before you lay anything down, clean off the roof surface.
Remove branches, broken shingles, leaves, and other debris that could interfere with the tarp's seal. Anything stuck underneath could create gaps or allow rain to pool in the wrong spots.
Use a broom or your gloved hands to sweep the area clean and dry.
Measure the Damage
Take your tape measure and calculate the full size of the damaged area, including a few feet of space in every direction.
You want the tarp to extend well beyond the leak to prevent water from sneaking in around the edges. The more overhang you have, the better protection you'll get.
Make sure you measure twice before choosing your tarp size.
Choosing the Right Tarp and Tools
The quality of your materials can make or break your tarp job. A thin tarp, weak nails, or lightweight boards won't hold up when the next rainstorm rolls through. Use strong, durable materials that can handle a few weeks of wind, rain, and sun exposure.
Pick a Heavy-Duty Tarp
Not all roof tarps are created equal.
Look for one made from thick polyethylene with UV protection, ideally at least 8 mil thick. The tarp should be large enough to fully cover the damaged area and stretch over the ridge if needed.
Avoid using old or worn tarps with small holes or thin spots.
A strong, undamaged tarp will last longer and give you better results.
Gather the Right Supplies
You'll need more than just a tarp.
Grab 2×4 wooden boards or something similar to use as anchor points.
Roofing nails, cap nails, or screws are essential for keeping the tarp in place.
You'll also need a hammer or screw gun, gloves, and possibly waterproof tape for any cutouts.
Load up everything you need in a toolbox or bucket to carry safely up the ladder.
Attaching the Tarp: Nail vs. No-Nail Methods
How you secure your tarp depends on the materials you have and how long you need it to stay in place. There are two common approaches: one using nails and boards, and one using adhesive-backed tarps.
With Roofing Nails and Wooden Boards
This is the strongest and most reliable method.
Start by laying the tarp over the damaged section, allowing it to extend a few feet past all edges.
Wrap one end of the tarp around a 2×4, then nail the board into the roof near the ridge.
Sandwich the tarp with a second board nailed directly on top. This keeps the tarp tight and helps prevent it from flapping in the wind.
Repeat this setup along the other sides to fully secure the tarp.
Without Nails
If you want to avoid puncturing your shingles, adhesive tarps are a decent short-term option.
These tarps stick directly to the surface and don't require nails, screws, or boards. They're easier to install and remove, but they don't last as long and may come loose in strong winds.
Make sure the roof is dry and clean before sticking the tarp down.
Press firmly along all edges to seal it in place.
Dealing With Vents, Chimneys, and Other Obstacles
Most roofs have vents, skylights, or chimneys that can get in the way of your tarp. Ignoring them or stretching the tarp over the top will only lead to leaks. You'll need to work around these features with care.
Cut Around the Obstacles
Use a sharp utility knife to make clean cuts in the tarp around any roof features.
Be careful not to tear too far or leave large gaps.
Once the tarp is fitted around the obstacle, use heavy-duty waterproof tape to seal the edges. This keeps water from seeping in where the tarp had to be opened.
Take your time during this step so you don't accidentally create a new problem while solving the old one.
Securing the Tarp for Wind and Rain
A tarp won't do much good if the wind picks it up or rain finds its way underneath. Securing every side properly is just as important as choosing the right materials.
Anchor All Sides
Once the top edge is secured at the ridge, move to the sides and bottom.
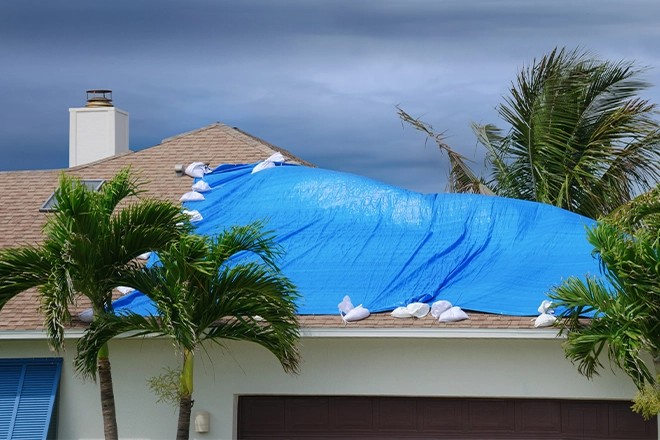
Wrap the tarp around more wooden boards and fasten them just like you did at the top. If you're using sandbags instead, place them firmly along the bottom edge to weigh the tarp down.
Everything should feel tight, with no gaps or slack in the material.
Double-check every corner before climbing down.
Slope for Drainage
Water should always be directed away from the house.
By anchoring the top edge first and letting the rest slope downward, you'll help rain run off instead of pooling.
Avoid having low spots or dips where water might collect.
If needed, tuck or fold the tarp slightly to guide the flow toward the edge of the roof or gutter.
Keeping an Eye on It
Even the best tarp job needs to be monitored. A loose edge, small tear, or new damage can lead to leaks that undo all your hard work. Keep a close eye on your tarp until permanent repairs are made.
Do you need roof repair or replacement?
How Long Can It Stay Up
Most tarps are designed to last between 30 and 90 days, depending on the weather and the quality of the materials.
Inspect your tarp every few days, especially after a storm or windy day. Look for signs of movement, pooling water, or holes.
If anything looks off, reinforce the affected area before it causes a leak.
Know When to Call a Pro
Tarping a roof is a temporary fix, not a full solution.
If the damaged area spreads, or if you're dealing with multiple leaks or layers of water damage, it's time to contact a roofer. Your insurance company may also want photos of the tarp job, along with estimates for a full repair.
Don't wait too long to schedule that next step.
How to get your insurance to pay for a new roof.
Cover Your Bases, Then Call Clifton Exteriors
If a storm left your roof exposed, Clifton Exteriors is ready to step in with expert roof replacement and installation services across northern Virginia. Our team knows how to move fast, work clean, and leave you with a roof built to last.
Don't wait for the next round of wind or rain to do more damage. Fill out our contact form today or give us a call.